Modern applications rely on authorizing user's access to their application. One of the best practice is to perform a OAuth2 authorization for the endpoint exposed by an application. These applications when broken down into smaller micro-services expose many endpoints as such, protecting all of them becomes a continuous and tedious job. A general pattern is to embed a OAuth2 client/library into each micro service to help protect these exposed endpoints. If these micro-services are being written in different languages, it adds additional complexity of keeping all libraries to its latest approved version and vulnerability free.
In this blog, we will look at a sidecar pattern which would help achieve the above stated drawbacks/overhead and additionally provide a uniformity among all your micro-services with respect to protecting endpoint with OAuth2 workflow. This pattern demonstrates how can you configure the application sidecar to generate and validate the minted JWT for each micro service without a single line of code change in your application in an easy maintainable fashion.
The sidecar pattern
In a cloud native world, a sidecar is a well known pattern where functionalities of an application are segregated into a separate process to provide isolation and encapsulation. Important point here to note is that it is assumed that the sidecar and the application are residing in an encapsulated environment which is trusted. Thus, all the communications between an application and a sidecar are trusted.
This provides an opportunity to offload the authorization and authentication with the sidecar. The sidecar will let the incoming connection pass through the application only after a successful authorization and authentication. This pattern greatly helps a polyglot application.
What’s in it for application teams?
- Zero trust: When two micro-services interact with each other it has to trust each and every layer involved in the communication. Dynamic nature of workloads makes us question if perimeter or L4 firewall configurations is good enough. It may not be and hence zero trust is becoming very relevant for applications. Each workload is provided with identity and policies are build over these identity to ascertain the connection. Thus, not only bottom layers but higher layers should also attest the connection. OAuth2 helps us achieve zero trust, thus, conforms to best practice.
- All endpoints secured automatically: By adding a sidecar and making sure the application can communicate only via the sidecar, all the application endpoints are automatically secured. Now to expose an endpoint application has to configure the sidecar.
- Uniformity leading to seamless support: As OAuth2 is the strategic solution for authentication/authorization, this gives a cleaner adoption within teams to configure the sidecar and not write any relevant code. Thus, a much better developer experience and ease of maintainability of code. With this the application only needs to implement its business logic, rest all cross cutting concerns are moved to the sidecar. A plug-gable sidecar helps support multiple application languages and/or frameworks. A huge plus!
- Native OAuth2 integration with Envoy: Presently applications use external authorization framework along with OPA (Open Policy Agent) to satisfy their authorization need. With the pattern described below now you can get rid of external authorization sidecar as envoy supports this feature natively. Thus, removal of extra components.
Example
For establishing the pattern, we will have an unprotected hello-world application with envoyproxy as the choice of sidecar. Envoy will be configured to protect the application.
The sidecar will be configured for:
- OAuth2 workflow: When an unauthenticated/unauthorized access is detected by the sidecar, the user is automatically redirected to an identity service and presented with a login page. When the authentication is successful, the browser is redirected to an implicit OIDC callback endpoint intercepted by the sidecar. The sidecar thus, obtains identity tokens from the identity service and then redirects users back to their originally requested page in their web apps. The identity token is further refreshed from the sidecar until the token expires.
- JWT token validation: Once user is authenticated, user would be passing this identity token(bearer token) when it wants to access the endpoint. If the token is valid, user should be provided access to the endpoint.
Deployment setup
Here is a pictorial view of how the deployment is setup. Envoy and the application will be running on a VM. Browser will connect to the application via envoy sidecar. OAuth2 workflow will be initialed by envoy sidecar. Upon passing validation, envoy sidecar will allow the connection to the back-end application.
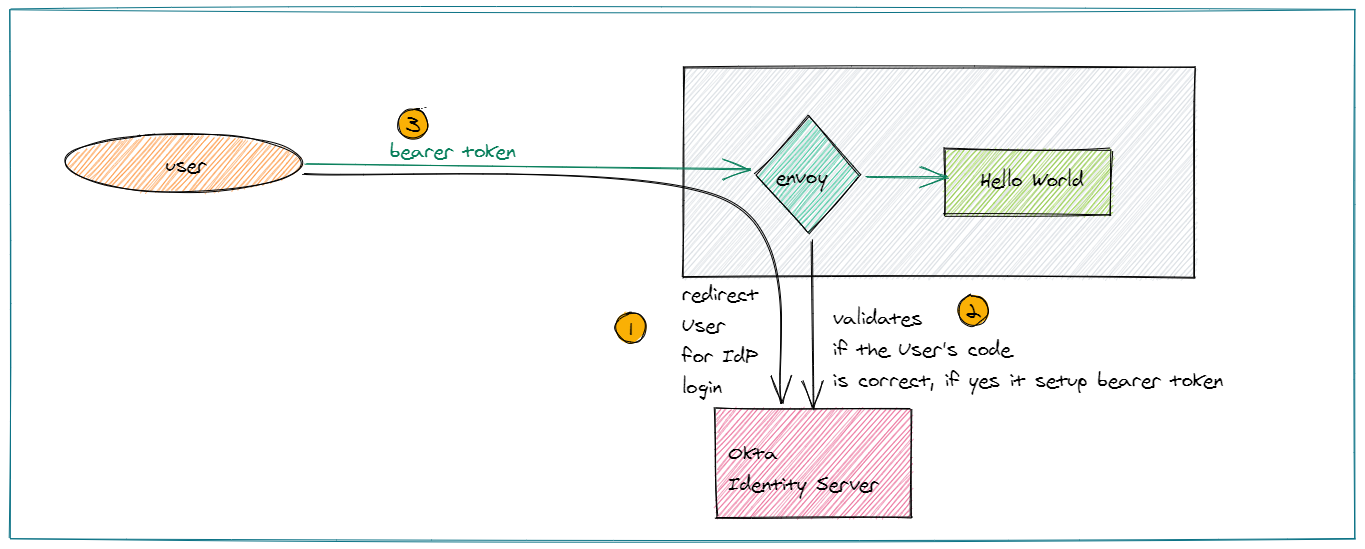
The diagram shows how an envoy sidecar protects the application. The envoy sidecar initiates the OAuth2 workflow and only authorized connections are allowed to the application.
Requirements and Steps to configure the setup
1. Log in to the Linux machine
2. Write a hello world application which you want to protect. This can be written in your favorite language no restriction.
a. Open a new terminal.
- Start your application. Just make sure http://localhost:8001 is available on your application.
- In case you have a python environment you can run this command:
mkdir -p /tmp/123 ; cd /tmp/123; echo "$HOSTNAME" > index.html ; python3 -m http.server --bind 127.0.0.1 8001
3. For IDA server, we are going to use Okta as our Identity server. Its very easy to setup. a. If you don’t have an Okta account, go ahead and create one. Once you have signed up, go through the following steps:
- Login into your account
- Click on Applications > Add Application
- Select Web from the drop-down and choose OpenID connect. Click Create.
- Fill in the following options in the form
- Name: hello-world
- Login redirect URLs: http://localhost:8001/callback
- Grant Type allowed
- Client Credentials
- Authorization Code
- Click Done.
- From the assignment tab add users for your application.
b. Make a note of the below inputs needed to setup the envoy sidecar
- client Id: Public identifier for the client that is required for all OAuth flows.
- client secret: It should be kept confidential. Its the secret used by the client to exchange an authorization code for a token.
- endpoints from the Okta ida server:
- token endpoints
- authorization endpoint
- application redirect url
- jwks (keys) endpoint
4. Envoyproxy binary: Pick the latest binary for your machine. Use func-e to download and install the binary.
a. Get basic understanding on envoy filters and their usage. We are going to use the below filters in this example:
- OAuth2: https://www.envoyproxy.io/docs/envoy/latest/configuration/http/http_filters/oauth2_filter.html
- JWT: https://www.envoyproxy.io/docs/envoy/latest/configuration/http/http_filters/jwt_authn_filter
b. Envoy static configuration: This is a bootstrap file used by envoy binary to load its configuration. Copy paste the content into a file and save as 'envoy.yml'.
Source
static_resources:
secrets:
- name: token
generic_secret:
secret:
inline_string: <Your token secret here>
- name: hmac
generic_secret:
secret:
inline_string: <Your token secret here>
listeners:
- address:
socket_address:
address: 0.0.0.0
port_value: 8000
filter_chains:
- filters:
- name: envoy.filters.network.http_connection_manager
typed_config:
"@type": type.googleapis.com/envoy.extensions.filters.network.http_connection_manager.v3.HttpConnectionManager
codec_type: AUTO
stat_prefix: ingress_http
route_config:
name: local_route
virtual_hosts:
- name: upstream
domains:
- "*"
routes:
- match:
prefix: "/"
route:
cluster: upstream-service
http_filters:
- name: envoy.filters.http.oauth2
typed_config:
"@type": type.googleapis.com/envoy.extensions.filters.http.oauth2.v3.OAuth2
config:
token_endpoint:
cluster: oauth
uri: "https://<server>/oauth2/default/v1/token"
timeout: 5s
authorization_endpoint: "https://<server>/oauth2/default/v1/authorize"
redirect_uri: "http://localhost:8000/callback"
redirect_path_matcher:
path:
exact: /callback
signout_path:
path:
exact: /signout
forward_bearer_token: true
credentials:
client_id: <client id>
token_secret:
name: token
hmac_secret:
name: hmac
auth_scopes:
- openid
- name: envoy.filters.http.jwt_authn
typed_config:
"@type": type.googleapis.com/envoy.extensions.filters.http.jwt_authn.v3.JwtAuthentication
providers:
provider1:
remote_jwks:
http_uri:
uri: "https://<server>/oauth2/default/v1/keys"
cluster: oauth
timeout: 5s
cache_duration: 600s
rules:
- match:
prefix: /
requires:
provider_name: provider1
- name: envoy.filters.http.router
typed_config: {}
clusters:
- name: upstream-service
connect_timeout: 2s
type: STRICT_DNS
lb_policy: ROUND_ROBIN
load_assignment:
cluster_name: upstream-service
endpoints:
- lb_endpoints:
- endpoint:
address:
socket_address:
address: 127.0.0.1
port_value: 8001
- name: oauth
connect_timeout: 2s
type: STRICT_DNS
lb_policy: ROUND_ROBIN
load_assignment:
cluster_name: oauth
endpoints:
- lb_endpoints:
- endpoint:
address:
socket_address:
address: <server>
port_value: 443
transport_socket:
name: envoy.transport_sockets.tls
typed_config:
"@type": type.googleapis.com/envoy.extensions.transport_sockets.tls.v3.UpstreamTlsContext
sni: <server>
c. Edit the envoy.yml and fill the missing configuration items. They are marked with <> brackets.
d. Start the envoy binary. It will start listening on localhost:8000
envoy -c envoy.yml
5. Open a browser on the VM and hit 'localhost:8000'
a. you would reach envoy proxy
b. envoy should redirect you to Okta server which will ask you to authenticate yourself. In case you are already logged in, this step will happen automatically and it will not prompt you.
c. upon successful authentication, control will be passed to the back-end application and application will display its content on the browser.
Next steps (Advance options)
You can now try to extend the above example by
- adding more validations on the JWT
- adding a RBAC filter after JWT filter on envoy
- passing the decoded JWT to the back-end application
- passing the entire JWT to the back-end application for further processing or verification in case your application has a mandate to verify the JWT again.
This setup can be very easily replicated in a Kubernetes platform where envoy and application container can reside in a pod.